When using tools like TimeTrade or Unified Communications systems, you need to set-up an MS Exchange service account with ApplicationImpersonation permission. This permission allows the service account to read and write other user’s mailboxes within your organization (all of them or scoped using a filter). If you need to confirm that the permissions were granted correctly when you’re troubleshooting something here’s how you can do it.
METHOD 1: EWSEDITOR
EWSEditor is a cool open-source tool that can be used (among other very helpful things) to test EWS impersonation. You can download it here. (ALWAYS scan downloaded files using an up-to-date antivirus!) After running EWSEditor.exe, click “File -> New Exchange service…”
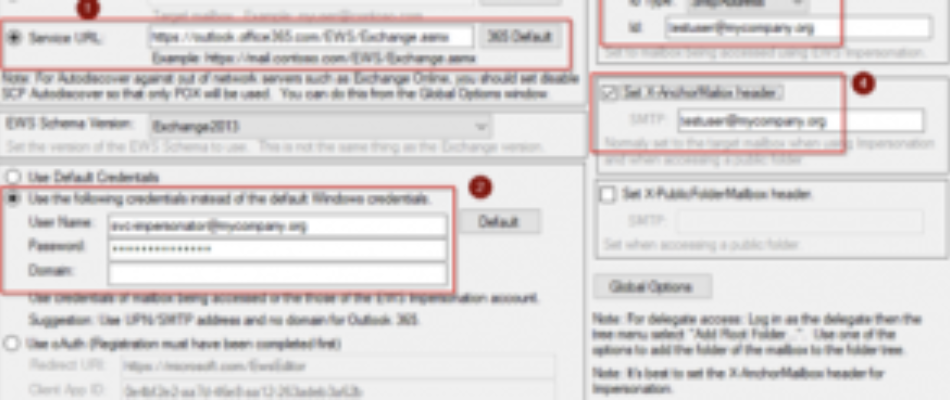
For simplicity, uncheck “Autodiscover URL” and check “Service URL” (please note that in some advanced scenarios you’ll have to use autodiscover). Populate the URL with your EWS url or click “365 default” if using Office365 (please note that the URL will be different for Government, Chinese or German clouds). Switch authentication to “Use the following credentials” and type the full UPN of your service account and its password. Check the “EWS impersonation” and “Set X-AnchorMailbox” checkboxes and type email address of a user within management scope of the service account. Click “OK”.
If everything is configured properly, you will be prompted to automatically open mailbox root (click “Yes”) and will be presented with the tree view of the target mailbox contents. In this example we successfully used svc-impersonator@mycompany.org to open testuser@mycompany.org, so ApplicationImpersonation permission is working correctly.
METHOD 2: MANAGED EWS API AND POWERSHELL
Download and install Managed EWS API here. (ALWAYS scan downloaded files using an up-to-date antivirus!) Open PowerShell session (no need for Exchange Management Shell, regular ISE should do it).
Copy, paste and run the following script:
Import-Module "C:\Program Files\Microsoft\Exchange\Web Services\2.2\Microsoft.Exchange.WebServices.dll"
$exchangeCredentials = Get-Credential -Message "Please enter the credentials of the service account with ApplicationImpersonation management role"
$mailboxName = Read-Host -Prompt "Please enter the target mailbox to open"
$EWSurl = if (($EWSurl = Read-Host "Please enter the EWS URL [press Enter to use O365 default]") -eq '') {"https://outlook.office365.com/EWS/Exchange.asmx"} else {$EWSurl}
$EWSconnection = New-Object -TypeName Microsoft.Exchange.WebServices.Data.ExchangeService([Microsoft.Exchange.WebServices.Data.ExchangeVersion]::Exchange2013_SP1);
$EWSconnection.Credentials = New-Object -TypeName Microsoft.Exchange.WebServices.Data.WebCredentials($exchangeCredentials.UserName, $exchangeCredentials.GetNetworkCredential().Password)
$EWSconnection.Url = $EWSurl
$sourceFolderName = New-Object Microsoft.Exchange.WebServices.Data.FolderId([Microsoft.Exchange.WebServices.Data.WellKnownFolderName]::Inbox)
$EWSconnection.ImpersonatedUserId = New-Object Microsoft.Exchange.WebServices.Data.ImpersonatedUserId([Microsoft.Exchange.WebServices.Data.ConnectingIdType]::SmtpAddress, $mailboxName)
$EWSconnection.HttpHeaders.Add("X-AnchorMailbox", $mailboxName)
$sourceFolder = [Microsoft.Exchange.WebServices.Data.Folder]::Bind($EWSconnection, $sourceFolderName)
$sourceFolder.Load()
$itemView = New-Object Microsoft.Exchange.WebServices.Data.ItemView(20)
$items = $EWSconnection.Finditems($sourceFolder.id, $null, $itemView)
$sourceFolder.Load()
$selectedEmail = $items | Out-GridView -OutputMode Single -Title "20 most recent emails in inbox"
You will be prompted for the credentials of a service account, email address of a target mailbox and EWS URL (just press “Enter” to use O365 default). If everything is configured properly, you will see a popup with the metadata of the 20 most recent emails in the target user’s inbox. If you see any errors, doublecheck the service account credentials and its permissions.